Part 2 - Cloud Setup
Intro
At work, I have had exposure to both Amazon Web Services (AWS) and Microsoft’s Azure. I wanted to set up a personal site on Google Cloud Platform (GCP) for the experience and to have a point of reference in comparison between the top cloud providers.
I have learned that the free tier offered by GCP is pretty incredible and that to host a basic site can be 100% free. Unless, of course, your site is crazy awesome and gets a massive amount of traffic, then your next step is to figure out how to add ads to generate revenue to pay for the extra fees incurred by all the site traffic.
In this part of the tutorial, the following sections will break down how to get started with GCP, create a basic site, and deploy the site to AppEngine.
Tutorial Steps Outlined:
- Google Cloud Platform
- Sign-up For Free GCP Tier
- Create Project & Application In AppEngine
- Download SDK & GO CLI
- Deploy Code To AppEngine
GCP Sign-up
Go to GCP, and sign up for the free trial to get a \$300 credit: https://cloud.google.com/free-trail.
Note: The credit is just for the first year, and for this tutorial you should not incur usages fees.
From your new account at: https://cloud.google.com click on the Go To Console button to be redirected to: https://console.cloud.google.com where we will remain for the rest of the online part of this tutorial.
GCP: App Engine
Click on the hamburger menu in the top left hover over App Engine click Dashboard.
1. New Project
Steps, when viewing the App Engine - Dashboard:
- In the top menu, click on the project menu item,
Select a projectthat is to the right of to open popup modal.- Going forward, this spot will reflect the currently active project that the left menu pertains to.
- Click
New Projectin the top right to create your first project.
Note: If you have trouble following the steps above, use this URL and click Create to get to the same create project page.
Type gopher-root as the project name, leave location as No organization and click, Create.
A notification should popup saying the project is being created.
2. Create Application
Go to the top menu, click Select a project that is to the right of to open popup modal again and this time select the new project, gopher-root.
Click Create Application and follow the steps:
- Select the region you want the app to run in, IE: I choose
us-central. - Click
Create app. - Choose Language:
Goand Environment:Standard - Click
Next.- Another notification should popup saying - Your App Engine app has successfully been created.
- Click
Download the Cloud SDKand the next section covers this. - Click
I'll Do This Laterto close out of the setup wizard.
3. Google Cloud SDK Setup
Open the SDK download page and choose the install for your OS.
{follow OS specific install instructions … waiting for you to complete step…}
Initialize SDK:
gcloud init
The step above will take you through a series of steps to connect your GCP account to gcloud. Follow the prompt to log in: Y and then login to the browser window the terminal opens for you. Once logged in, choose gopher-root cloud-project when prompted if able. If not, use the default project in option [1] and do NOT create a new project [2] here as you can change it later. Because the new project was created asynchronously in GCP, the project list in gcloud will eventually show our project.
To show the authenticated GCloud account and default project:
gcloud auth list
gcloud config list project
Install Go CLI:
gcloud components install app-engine-go
Code, Test, & Deploy App
1. Update Code
In the last tutorial, the go code was just a basic print line to stdout saying «hello, world». Now, we need to get a bit more fancy and write a go server that serves up a static page.
Replace contents of main.go with:
package main

import (
    "io"
    "log"
    "net/http"
)

func main() {
    log.Println("Go server starting...")
    http.HandleFunc("/", handler)

    http.ListenAndServe(":8080", nil)
}

func handler(w http.ResponseWriter, r *http.Request) {
    io.WriteString(w, "hello, world")
}
2. Test Code
Run code locally to confirm it works. In a terminal inside the gopher folder:
go run main.go
The terminal should update with a log message it started.
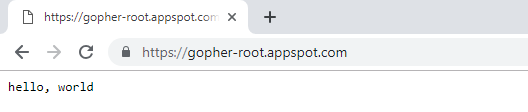
To watch the server return «hello, world», open browser - http://localhost:8080/.

To stop the server, in the terminal window where it is running, press «Ctlr» + «c» to cancel. The terminal should print «exit status 2» in response and return you back to be free to type more commands again.

3. Deploy Application
Next, we need to tell gcloud what code to deploy.
Add app.yaml file with:
runtime: go111

handlers:
- url: /.*
  script: auto
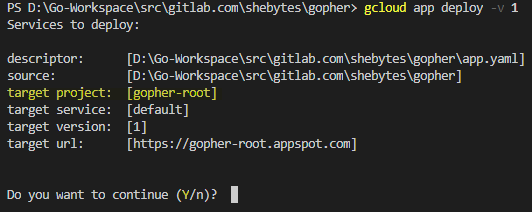
To deploy application to GCP - App Engine, open up a terminal and follow these steps:
Deploy the site as version 1:
NOTE: Must be in the root of the gopher folder for this step to work.
gcloud app deploy -v 1
Confirm the «target project» is correct, then press «y» to continue:
- NOTE: If target project is not correct, see GCloud - Change Active Project section below.
Then gcloud reports how many files were uploaded and then sets traffic to hit the code:
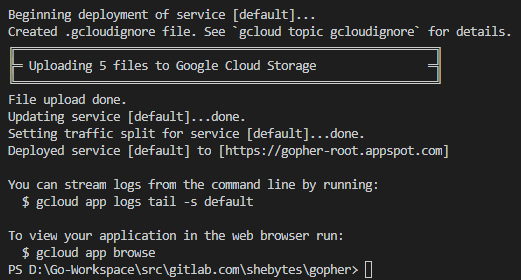
Open the target url and confirm site is live and working:
gcloud app browse -v 1
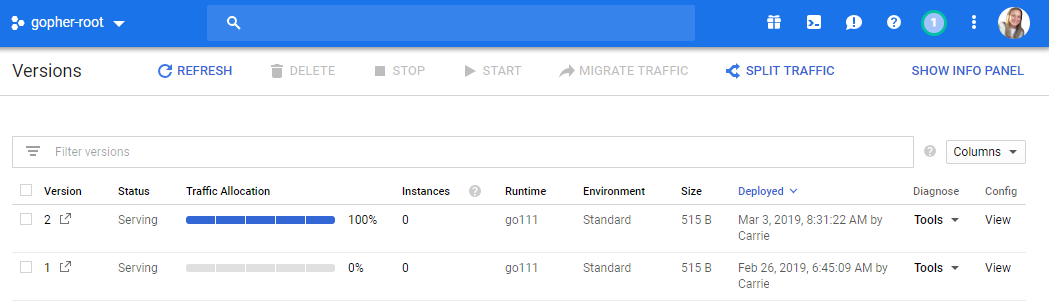
View Deployed Versions in App Engine
Click on GCP’s hamburger menu in the top left hover over App Engine click Versions.
We just deployed version 1 in the previous step. Run the same command but with 2 instead of 1 at the end and watch the steps described in the terminal closer. When the code is successfully deployed, the traffic is switch to the new code path seamlessly and we can revert quickly if the changes had an unexpected «feature».
GCloud - Change Active Project
View list of projects:
gcloud projects list
To change the default project intended to deploy to if needed:
NOTE: the value after «project» is the PROJECT-ID.
gcloud config set project gopher-root
Next Step
Click the «Next» button below to proceed in this tutorial series to «Part 3 - Domain Hookup».